
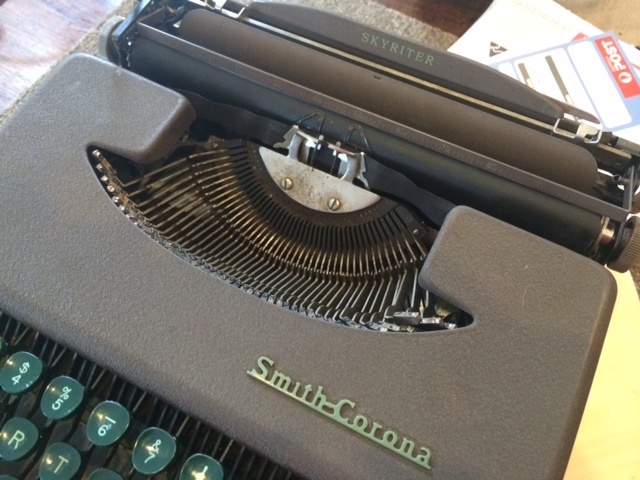
Meet the Smith-Corona Skyriter.
For those who aren’t familiar with the story, Rino from the ‘Long, slow {typecast} blog‘ experimented with using an off-cut from a bicycle inner-tube to re-cover (or more accurately, cover) a platen. The idea was to get the typewriter to type quieter, and have a better grip on the paper. In effect, Rino was trying to do what getting a professional re-cover of a platen does, but cheaper.
Rino had reasonable success with this technique on his Hermes 3000, and the write-up on this can be found HERE. I was lucky enough to have a try on Rino’s machine at the 2013 Brisbane Type-in, and I was quite impressed. However, I didn’t think too much more about it until over a year later I was in John Lavery’s workshop while he was doing a service on Rino’s Remington Quiet-riter.
John was giving Rino’s machine a few test-jabs at the keyboard when I noticed something quite different about this machine. Here was a Quiet-riter writing… well… quietly. I mean, really quietly. The kind of quietly you would expect from a typewriter called a Quiet-riter. It wasn’t until I enquired if Rino had had the platen recovered that he told me that he’d used the same bike tube technique on this machine.
Suddenly I felt inspired to give it a try myself.
Enter the skyriter….

I bought this machine off Bob Skrezyna over at the wordrebel.com blog fairly recently. After reading so much from members of the typosphere about how great these machines are (for traveller typewriters) I’d been eager to give one a go. Bill over at the Fountain Pens and Typewriters blog is particularly fond of them, so I felt it one was definitely worth a try.
When the machine arrived there were several things wrong with it that required some hands-on attention. But with the exception of a single screw the typewriter was complete and working. I set about servicing it, and in the process found the rather small platen to be quite petrified – something that isn’t particularly unusual for a machine of its age.
Jane’s sister, Phillipa, recently had her bicycle serviced so I asked her while she was at the shop if she could grab some tubes for me. She got hold of one, which has since been sitting in my toolbox waiting for the right opportunity for it to be used. That opportunity came with the Skyriter, as the tube was pretty close to the perfect size for use on this machine’s platen.

Reversing the tube – not as simple as it seems!
So I cut off a piece and flipped it inside out as per instructions. However this was no simple task. Just getting the narrower tube inside out was a real struggle that took some additional tools to try and hook it from the other side and pull it through. I soon realised that the thinner width tube-size of these small platen machines was going to prove some problems that Rino may not have encountered on the larger size of the mid-sized portable machines. While the tube may be thinner, the rubber was just as thick as the wider tubes.
Just stretch… and pull… and….. ahhhhhrrfffffff!
Getting the rubber on proved a lot harder than expected. The tube was admittedly smaller than the platen, so I knew I had my work cut out for me – but I didn’t expect it to be as hard as it was. I even tried using vegetable oil to help it get on, which achieved nothing, and actually made it just harder to hold the whole thing. So I scrubbed the oil off with soap and hot water and continued trying.
 I started having success by gripping the rubber in both hands with a piece of fabric wrapped around it, and pushing down hard…. Really hard…
I would slowly slide down the platen as I did, but every time I did the tube moved a few millimetres more. It was about this point that I wished I had my air-compressor, as I realised I could have just blown it into the tube at one end and just used the air pressure to expand the tube enough that I could slip it down the platen.
The original platen’s rubber also slipped down the platen core while I did all this. If you look closely you can see in the photo above the old rubber is jammed hard against the line-space cog. This would interfere with the operation of the cog if I didn’t rectify it afterwards.

And yes, I did swear. Lots…. and Lots.
Eventually I found that when there was enough rubber on the platen, I could twist the rubber in alternating directions from the top and bottom, which would cause the rubber to contort, and slip down the platen easier. I just had twist it back once I had moved it. The technique was bizarre, but it worked. And eventually with arms that ached like I had just done the hardest workout of my life, I got the tube all the way along the platen.
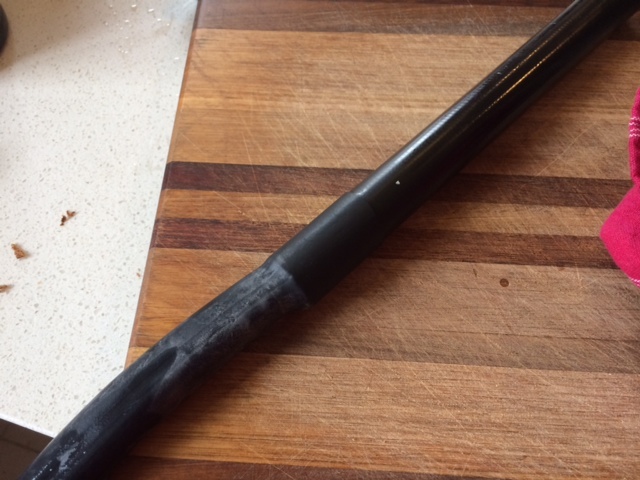
 Which I then trimmed.
 Because the old rubber was now jammed so hard up against the cog, I found that I needed to slide it back. However that was easier said than done. The rubber wouldn’t just push back into position, and it became clear that I needed to try some more drastic options. So I unscrewed the cog from the wooden platen core and lined up a shifter on either side of the core to give me a bit of a lateral surface against the rubber that could be hammered without the old rubber crumbling away.


Sorry for the blurry shot. Hard to hold everything into place while photographing this.
After a few taps the rubber shifted back and the platen set itself back into position nicely. With that, I slapped it all back into the machine, bolted it into place… and eagerly gave it a try.
So, was it all worth it? Well. I have mixed feelings about the result. Firstly – the good part: the platen is bloody quiet. With the platen now back in the machine I hit a couple of keys and found that the noise of the stubs hitting the platen is quieter than the noise of the type-bars dropping back onto the rubber padding in the basket. Add some paper, and the noise is about the same between them. In essence – quieter. It even grips the paper really well too. In fact, too well.
The problems start when paper isn’t already in the machine. The rubber grips hard against the back of the card holders, and when you turn the platen they provide a fair amount of resistance. You can even see them vibrating as the platen is turned. Odlly, the resistance abates when you turn the platen the other way, but no-one is likely to be feeding paper into a machine from the front of the platen. When feeding the paper the regular way, the moment the paper gets to the card holders the whole things works smoothly and you’d never notice that there was a problem at all. Unless you needed to shift the paper sideways.
The other problem is that the platen is now just a little too wide for the whole carriage to fully release grip of the paper when you release the rollers to slide the paper around. Why is this a problem on the skyriter when it hasn’t been a problem on the bigger machines? Well, let’s talk about what happens when rubber ages.
The synthetic rubber on these platens is a pretty specific chemical compound. One of the chemicals that are mixed in is a substance that is referred to as an ‘elasticiser’. This stuff in essence gives the rubber its ‘stretch’. However over time this substance evaporates from the rubber, leaving behind a tough but often brittle compound. Not only that, but the rubber reduces in size. In platens this means that the platen reduces (usually evenly) in diameter.
On machines with medium to large platens the rubber shrinks a fair bit. However the smaller platens don’t change in diameter as much as the bigger ones. Also, the smaller platen machines are often constructed to only accommodate the thickness of a piece of paper, and aren’t quite so tolerant of thicker pieces or being used for carbon copies. So there’s a real problem with space around traveller-sized typewriter platens.
The tube experiments on the larger machines has been successful due to the larger amount of space to play in. This skyriter however has difficulties due to its scaled down size with less tolerance in the smaller spaces inside of the machine.
The effort was worth it though. I spent a bit of time on the machine tapping out a letter after I finished the recovering, and I really appreciated the quieter tone from the platen. As for the machine itself? Well, I think my assessment about this typewriter may be the subject of another blog in the near future. Perhaps a full review of a machine is due.
Now…. I think I need to take a nice healing bath. My arms are so very, very sore.

Great write-up Scott. It made me laugh just thinking of you grappling with that rubber hose!!! Lovely portable, glad it’s still useable despite a few paper feeding problems. 🙂
LikeLike
Ha ha. Thanks. It would have looked very entertaining to anyone watching it!
LikeLike
Perhaps you have just invented another competition (besides speed typing) for typewriter gatherings… 🙂
LikeLike
Well… I think I certainly added to my muscle-tone. A competition you say!
LikeLike
I’m thinking condoms. Seriously.
If you had turned the tube inside out and then rolled it up like a condom, could you have then rolled it onto the…erect platen?
Couldn’t help that last part.
I gotta get a Skyriter.
LikeLike
I’d have a bit of a try of mine first. I wouldn’t knock yourself out over this machine. I’ll do a review on it soon.
As for the condom, that would give it grip for sure. But sadly no cushion. I like the theory though.
LikeLike
I tried with a balloon (such as used to make animal sculptures) but it broke too easily to be any good. I was trying that because of the thickness issue you mention with the tube section. Tolerances are so close on the ultraportables. Very well-told story though.
LikeLike
Ahhhhhhh I thought that might be the case. Latex is a bit pissweak when it comes to this stuff.
LikeLike
I’ll doubt it will roll up that easily Teeritz.
The thickness part was forseeable (is that an official word?), but on some machines this indeed works great! I haven’t tried myself, too much work and definately too much frustration, but some of the teletypes at Hack42 got this treatment. These are also larger platens. Only the typearms needed some adjusting to the new thickness of the platen afterwards.
LikeLike
Ahhhhh Great to see you guys have been trying this out too. Nice work. I would love to hear what you guys did on the teletype machines.
LikeLike
Better results might be had if you ground down the old platen a turn or two on the lathe (John Lavery prolly has one) before applying the new tube. Just enough to account for so much extra thickness…
LikeLike
Would it surprise you that John and I were working on finding a lathe exactly like that, before I left Brisbane? You’re right… and it is something I have been thinking about considerably.
LikeLike
Thanks for reporting on this experiment. I’m curious to give it a try sometime. I’ll stock up on four-letter words.
LikeLike
I used a bunch of cheap 4 letter words that week. Believe me!
LikeLike
A really good effort Scott, I have foreseen the paper feed problems before the finish of the article and I was wondering how I could help. I guess that there is not much of a gap between the platen and card holder but I have not got a Skywriter to look at. There may be some way to form the card holder back towards the front of the machine to give the paper some clearance but of course, we would have to consider the free travel of the Ribbon Vibrator, not so “easy peasy” in this instance. H’mmm, I need to think about this one.
Ted is actually quite near the mark when he says grind down the old platen a millimetre or two. This would be trial and error at this stage but ultimately would be the correct approach. I can tell you that Ames had all the correct measurements pertaining to all typewriters and that they used some kind of mechanical device to force the new rubber on to the platen shaft. Perhaps In this instance I might have tried CRC instead of olive oil.
At this stage we are trying to find a solution to an old problem and top marks for continuing on the right path. Just one last thought, I have mentioned the Ring & Cylinder position a few times and if you can find how to adjust this on the Skywriter I would say problem solved but with the Skywriter being such a low level machine there may not be any facility for moving the carriage back. Can you see one? Some portable typewriters have this adjustment. others not, and by and large, the amount of room for the Ribbon Vibrator, Ribbon , card-holder and the sheet of paper is not very much. On the standard office machines it is expected that extra copies will be required and so the engineers make provision for this. However, this did not stop people trying to do multiple copy work on portable typewriters and then complain when it did not work out so well.
LikeLike
Thinking about it overnight, I guess Ted is closer than any of us to the real solution, just take the whole rubber off on the small travelling machines. The limitations of space available really do not let us do anything else. For me, I am going to look at radiator hose when I come across a small portable and maybe reserve the “Rino” option for the larger machines.
As I have mentioned elsewhere, Ames had a variety of rubber ranging from “soft” to “hard” and also they could slide one rubber over another achieving a “cushioned platen”, for a softer sound upon impact.
Naturally, they still had to operate within the boundaries of the specifications of that particular typewriter
As is the case when you gain something you have to lose something and in the case of the quiet platens you lost the ability to make multiple copies.
Any way Scott, you have set the hare running on this subject and I am looking forward to the solutions that will most assuredly will come out of the Typhosphere.
LikeLike
I can’t see why I couldn’t take off the thickness of the replacement rubber from the original platen rubber, and re-cover it. That might work. However the bike tyre looks like it could potentially slip in the right conditions. I don’t think this solution is ideal.
LikeLike
Resurfacing a platen on some old portable the other week I noticed that some one in the past had inserted a few very small nails into the ends of the platen essentially fixing the rubber onto the wooden core ensuring no rubber creep. The nails were fixed right at the ends of the platen so they did not interfere with any functions of the typewriter.
LikeLike
great effort, and nicely detailed too. Yes, the tubes can be a bother to get on the platen (they come in many different sizes though – and bike shops usually have a dozen types in their bin at the end of the day). And the rolling/drawing/I-was-going-to-say-frigging onto the platen can cause many a blister and annoyance. And clearance is going to be an issue with these smaller machines (even my quiet-riter is tight), and also there’s a light moulding seam in the tubes usually – so the paper-grab might be uneven or chunky at times. But I guess smaller typers are like smal laptops – less space to play with generally.
So if the typer has lots of give in the feed rollers (?) & platen housing then ok. And even then, taking off a mm or two might be a help – I’ve thought of trying to fit a platen into my neighbour’s wood lathe annd having a bash… but it’s not going to be a finely crafted artisinal job… 😉 cheers from Amsterdam – rino
LikeLike
Thanks for the write-up!
Just tried with the RP2 platen. No lathe, but careful sanding with emery paper and keeping track with vernier of the diameter reduced the diameter. Sanded lengthwise then, for easier slide-on. Using talcum powder, tube slides on fairly easy. No turning inside-out, just slides on. Worried actually it will give way over time when its mounted in the machine again.
(Also noted the small nail to keep the platen rubber from moving, also sanded that down 🙂
LikeLike
Ahhhh how did you go with keeping level? I only turned the tube inside out because it gives a smoother surface, as the non-reversed tube tends to have ridges from the rubber press.
Getting good results from the type?
LikeLike
Am very curious how it works now but no typing yet – machine frame still to be tackled…
Did careful checking of diameter, careful sanding and straight steel file to gauge/level lengthwise to keep it even and cylindrical. Not too bad result 🙂
Dang – could have inverted the tube. Indeed shallow ridges on surface, did some mild sanding down of tube and not too bad now.
LikeLike
My apologizes if I missed a similar suggestions in the numerous posts above however I like to mention that I’ve successfully used compressed air to remove and install rubber handle bar grips. Just might this installation easier.
LikeLike
Just might MAKE this installation easier.
LikeLike
I also got my skyriter platen re-covered!
LikeLike